Managing User-Based Notifications
Introduction
Matters.Cloud strives to
provide users with seamless communication and ensure they stay informed about
important updates, tasks, and events. By managing your notification settings,
you can tailor your experience to receive only the updates that are relevant to
your needs. This article will guide you through the process of customizing your
notifications.
Instructions for Account Owner
Step 1: Log in to
Matters.Cloud
- Access your Matters.Cloud account with your credentials.
Step 2: Navigate to
User Profile Settings
- Click on your name in
the top-right corner of the dashboard.
- From the dropdown
menu, select "Edit user profile".
Step 3: Access
Notification Settings
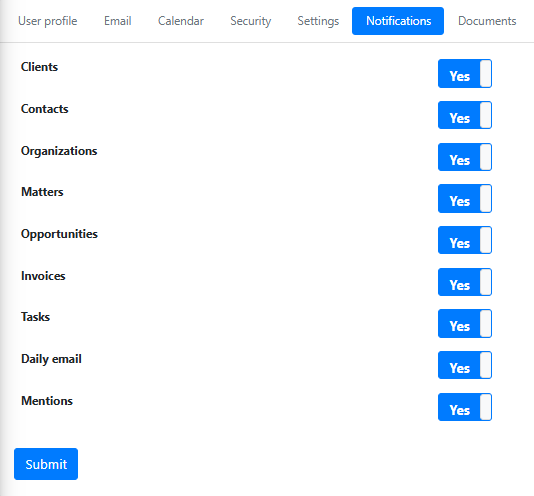
- Click on the "Notifications"
tab within your profile settings.
- Here, you'll see a
list of all available notification options.
Notification Options
You can manage the following
categories of notifications:
- Clients: Receive
notifications when a new client you are responsible for is created or when
an existing client is updated.
- Contacts:
Receive notifications when a new contact you are responsible for is
created or when an existing contact is updated.
- Organizations:
Receive notifications when a new organization you are responsible for is
created or when an existing organization is updated.
- Matters:
Receive notifications when a new matter you are responsible for is created
or when an existing matter is updated.
- Opportunities:
Receive notifications when a new opportunity you are responsible for is
created or when an existing opportunity is updated.
- Invoices: Receive
notifications when an invoice (or draft invoice) is assigned to you.
- Tasks:
Receive notifications when a new task you are responsible for is created
or when an existing task is updated.
- Daily
Email: Enable a daily summary email to receive an update on tasks
assigned or overdue, planned events and matters you are responsible for
which exceed their fee estimate threshold.
- Mentions: Receive notifications when you are mentioned in a comment on a client, matter, opportunity, contact or task.
How to Enable or Disable
Notifications
Step 1: Locate the notification
option you'd like to manage.
Step 2: Toggle the button next to each option to enable or disable notifications
according to your preferences.
Step 3: Click the Submit button in the bottom left-hand corner to save your changes.
Step 3: Click the Submit button in the bottom left-hand corner to save your changes.
Configuring Notifications as an Administrator
Administrators can also configure these notifications on behalf of a user:
- Go to Setup > Users.
- Select Edit user profile for the user you wish to manage.
- Toggle the button next to each notification option to enable or disable notifications according to the user’s needs.
- Click Submit to save the changes.