Understanding the Time Write Off Process
Introduction
Matters.Cloud offers two primary methods for effectively managing the time write-off process, supporting accurate financial reporting and operational transparency. This guide outlines the available options for writing off time, along with the required user permissions to perform these actions. Whether adjusting time entries directly within a matter or handling them during the invoicing stage, these approaches help streamline workflows and ensure reliable record-keeping.
Option 1: Write Off Time at the Invoicing Stage
To manage time write-offs during the invoicing process, it is recommended to set time entries to a billed amount of zero and mark them as hidden if they should not appear on the invoice. This ensures the time is retained for internal records while excluded from the client-facing document.
Follow the steps below to adjust time entries on an invoice accordingly.
Follow the steps below to adjust time entries on an invoice accordingly.
Step 1: Access the Invoices Section
- Locate the main navigation menu on the left-hand side of the dashboard.
- Click on Invoices > All Invoices to view all invoices of your firm.
- Use the Filter option in the top-right corner and select Draft to access draft invoices.
Step 2: Select the Invoice Associated with the Matter
- Use the search bar under the filter option or scroll through the list to find the invoice.
- Select the invoice associated with the matter you want to close.
Step 3: Set the Billed Amount to Zero
- Click the Time tab on the invoice page.
- Click the Edit button for the time entry you wish to write off.
- Set the Amount to Bill to 0.
Step 4: Hide Time Entry from the Invoice
- Toggle the button under the Hidden section.
- Click the Submit button in the bottom right-hand corner to save your changes.

Notes:
- This method enables the firm to retain a record of time entries while preventing them from appearing on the invoice.
- Items set to a value of zero will still be included in billing realisation calculations, even if they are hidden from the invoice.
- The hidden flag is optional, and zero-value items can still be displayed on the invoice if desired.
- It is not recommended to apply the hidden flag to items with non-zero values, as this may lead to inconsistencies or imbalances when detailed line items are included on the invoice.
Option 2: Mark Time Entries as Non-Billable
One way to write off time is by changing the status of time entries to non-billable. This ensures that the recorded time remains visible for internal tracking but is not included in client invoices. Follow these steps to mark time as non-billable.
Step 1: Navigate to the Matters Section
- Locate the main navigation menu on the left-hand side of the dashboard.
- Click on Matters to view all matters of your firm.
- Use the search bar under the filter option or scroll through the list to find the matter you wish to close, where unbilled hours exist.
Step 2: Select the Time Entries to Write Off
- Click on the Time tab to view all time entries.
- Click on WIP (Work In Progress) to view all unbilled time entries.
Step 3: Tagging Time Entries as Non-billable
- Click the edit icon under the Actions column.
- In the Billable Status section, click the dropdown and select Non-billable.
- Click the Submit button in the bottom right-hand corner to save your changes.
Option 3: Bulk Update Time Entries to Non-Billable
For a faster approach when handling multiple entries, you can update several time records at once using bulk selection.
Steps
Open the relevant matter.
Navigate to Time > WIP to view all unbilled time entries.
Select the entries in bulk using the checkboxes beside each record.
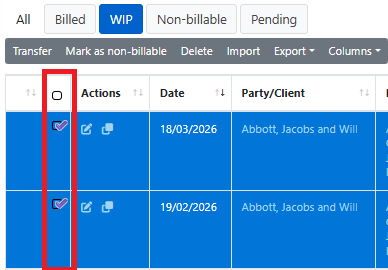
Click the Mark as Non-billable option.

A validation message will appear to confirm the action.
Click OK to proceed.
Open the relevant matter.
Navigate to Time > WIP to view all unbilled time entries.
Select the entries in bulk using the checkboxes beside each record.
Click the Mark as Non-billable option.
A validation message will appear to confirm the action.
Click OK to proceed.
Notes:
- This method allows the firm to retain a record of time entries while marking them as non-billable, ensuring they do not appear on the invoice.
- Time entries marked as non-billable will be excluded from reports that display billable time, and will affect any reporting that users may see.
- This approach does not affect billing realisation calculations, as non-billable items are not considered part of the billed value.
- Ensure the correct entries are selected before confirming.
-Once applied, the selected entries will remain visible but will not be included in billing or invoices.
Conclusion
By using either of these two options, firms can effectively manage time write-offs based on their internal processes and financial policies.
Related Articles
Related Articles
Understanding Rates Within Matters.Cloud
Introduction For legal and professional service firm understanding and applying hourly rates is critical for both internal reporting and when raising invoices to clients. Properly configured hourly rates ensure precise billing, managing to client ...How to Transfer Time
Introduction The transfer feature in Matters.Cloud allows you to move recorded time between both matters and opportunities. This is useful when time has been recorded against the wrong record, work needs to be reallocated, or billing arrangements ...How Do I Import Time Records?
Overview Matters.Cloud provides a simple to use facility to import existing time data when migrating from third party applications. Import Formats The following file formats are supported: Microsoft Excel (.xlsx) Comma Separated (.csv) Import Process ...Understanding Estimated Fees vs Actual Fees
Introduction When managing legal matters in Matters.Cloud, understanding the relationship between Estimated Fees and Actual Fees is crucial for maintaining effective budgeting, client communication, and firm profitability. By comparing these two ...Understanding Role-Based Permissions and How to Manage Them in Matters.Cloud
Introduction Role-based permissions in Matters.Cloud are designed to help administrators control user access to features and data across the system. This ensures users only have access to the information and actions necessary for their roles, helping ...